Friday, 14 January 2011

Print Workflow

 Print Workflow 


I have produced two final sets of 10 thematic printed images for the modules of this course. 
This is an outline of the print workflow that I have used to produce my images


Creation of my images:
I have produced  two sets of thematic photographs as requested in our module briefs. These are as follows:


Set 1 (Landscapes) The Lake district in Autumn
Set 2 (Portraits) Street Performers


The photographs were all taken by myself with my Canon 7D camera with various lenses and were all taken in the raw format.


I choose this type of format for my images because it gave me the best possible scope to manipulate my images. This format provided me with the best possible quality,tones,colours and clarity and in my opinion is 2nd to none. Using this format allowed me to completely transform, sometimes, completely lifeless dull images, into very acceptable photographs which would not be at all possible using other file types such as jpg


Using the raw format enabled me to use very large image files at roughly 20 MB per photograph which retains all details as when the photograph was captured. This is not a compressed format,so maximum definition and clarity was kept in my images. I then make 3 copies of my images. Copy one on my storage media hard drive. Copies 2 an 3 are copied to DVD discs as a back up solution for archiving


Catalogue my images:
After image capture I used the Adobe software "Bridge" to organize and catalogue my images
I used the software Adobe Bridge to catalogue my photographs after they have been taken. I  first loaded all of my raw files into this software(approx 500 images)where I viewed,graded and remove unwanted undesirable or out of focus images.

I then rated my images using a star rating system which is built into the software which enabled me to easily group and rate my photographs for final selection by labeling each image with a 1-5  
star rating


Shown below is a screen grab from my Bridge software which shows the star ratings given to my photographs which makes life far easier when I want to select a group of images all with the same ratings


Once graded with a star rating It is then very easy to display just 4 or 5 star images instead of trawling through all of your images to find your best shots


Selection of images:
Over the duration of this course I have taken approximately 500 images for my course work. I have submitted  2 groups of approx 20 images for final approval that my tutor and I have agreed on for the final selection of images to be printed.

I then then narrowed down  my final 10 images which will be going to print later in the course. My tutor and I have critiqued my final selection of images and replaced less desirable images with more suitable images that fit the criteria of the brief of the course


Post Process Images:
Next I loaded all of my final 20  images into Photoshop where I worked on them to embellish and enhance their appearance. I used Photoshop CS3 at home and CS5 in college to post process my images before going to print


This is the stage of the workflow where I manipulated all of my images before going to print. Some of my images needed certain processing to make them look their best. I changed lighting,tones,white balance,colour and sharpening. I set up"Batch processing" a technique in Photooshop or Bridge where  a group of images are selected and then worked on as a "batch" instead of working on them individually which would take hours to complete. This allowed me to process a large group of photographs which all have the same characteristics as one another. In this way  they all  had the same process applied to them for eg, image size and cropping


This grab shows how I set up an action in Photoshop to manipulate a whole batch of images before they were batch processed 


I set up an "action" within Photoshop which enabled me to "Batch Process" most of my images. I applied this process to all my images to change image size and cropping which saved altering every single image one by one which would have taken hours instead of minutes


Image sharpening and final checks:
I set up another "Action" within Photoshop that  applied a final sharpening of 15% to all of my images after post processing them.This, I find gave my images a final burst of sharpness and clarity. I find giving over 15-20 % sharpening to my images starts to degrade the images and adds  a more grainy effdect which is not pleasing to the eye. I used the unsharp mask filter within Photoshop for this process. I gave a last visual check to my images then gave a final check to remove any unwanted or obtrusive objects that would be shown in the final print


Paper Selection:
There are a large variety of various printing papers out there on the market for photographs
The major ones being Gloss,Satin and Matt. Different papers suit different photographs


I have used two different print sources to print my images for this course

One source is from an online printing company(DC Colour labs) that specialises in photogrphic printing,the other is from our college where I am studying this course. They both used inkjet printers for printing my images and I would say that the college printing is slightly better than the on-line printing.


The main reason for this, is printing from college allowed me to print using PSD files straight from Photoshop which is basically my raw file with which is a much more refined file format that a jpg.The online printing was good but they only print images from Jpg's which loose quality and clarity due to its compressed file format

I have used two different types of paper to print off my images. . 


Paper N0 1- (College Printing)  A3+ HP Satin/Gloss 250 g for college printing. I have used this paper and printing method to produce my test prints but the costs build up easily at £3.50 for an A3+ image


A3+ paper is the only size available to students.This paper produces very fine crisp clear results
with very good tonal and colour renditions. However, small banding lines are  produced by the printer on close-up examination are evident but the banding is not noticeable when the paper is viewed from over 1 foot or more away from the paper


Most of my images will be viewed at greater distances so the tiny banding marks will not be at all evident


Advantages of this printing process and it's paper


Clarity: Finer image detail
Print from Raw: Files printed straight from photoshop
Control: Having full control of how the print is managed and printed


Disadvantages: Slight banding at closer inspection. Costly at £3.50 per print


Paper N0 2 - (On-line printing, DC colour labs) A3 Fuji dp11 pro Lustre paper
This is a very nice paper giving a very smooth texture with good clarity with rich colours. However these prints always tend to be printed a little more on the dark side than what is actually viewed on a computer screen


Advantages of this printing process and it's paper


Cost: Only £1.05 for a A3 print
Speed: Order one day and deliver the next
Reliability: Great reliable service with consistent results
Copyright: Title and date printed on the reverse of the image 


Disadvantages: Only able to print from JPG's


I have used both of these papers before and both give pretty pleasing results but overall the college printing and paper have the edge over the online printing. This is mainly due to richer more vibrant colours, better clarity and a smoother texture on a thicker quality paper


Printer Setup and calibration and test prints:


This is the college A3 HP Photosmart Pro B9100 printer that I used to print some of my images for my course work


Before I begun to produce my test prints, I tested the calibration and set-up of the college Printer an HP Photosmart Pro B9100 series to make sure the printer was working fine. This involved making sure that ink supplies were sufficient and ink was flowing correctly through the print nozels. I carried out this process to check there was no fading,streaking or banding evident before I produced my final prints.


Shown above is a screen grab from our college printer and the utility that shows the actual remaining ink levels of the ink cartridges


To carry out the above checks I  produced a print calibration test page which automatically cleaned my print head nozels for me. This calibration  process also aligned and adjusted my print head nozels automatically. This procedure reduces banding and streaking marks that can be seen on prints that have not been calibrated


Shown above are all the processes that I performed before I printed my final images. Performing these routines assures printing will be at it's optimal best that the printer can perform


Printing a test pages shown above is essential, it will show streaking,banding and white lines if the printer is not set up correctly. The test page also allows me to check colours,clarity and sharpness which helps to confirm that the test print is pretty much what you see on the computer monitor.A very useful tool

I always carry out the above procedure before I complete any kind of printing in college which is an essential step in my print work flow


This is the stage of the work flow where I carry out all of my checks for potential printer problems. 
Some of the problems have been banding,streaking and fading in my images and blocked printer heads. These are all common printer problems which occur regularly and can usually be remedy'd by simple regular maintenance routines


I carried out all of the print problem repair routines listed above before I printed my final images.
This assured me I would have a problem free print workflow of my final images


My Image test prints: 
I will normally make at least 2 test prints of my own images to make sure that my colours in my test prints match as near as possible the colours and tones that I see on my colour computer monitor.


Shown below is one of my test prints that I have produced before I printed my final images. It shows the printer interface settings. This is the part of the printing process which enables me to manage printer properties, such as changing colour,profile,size and print parameters
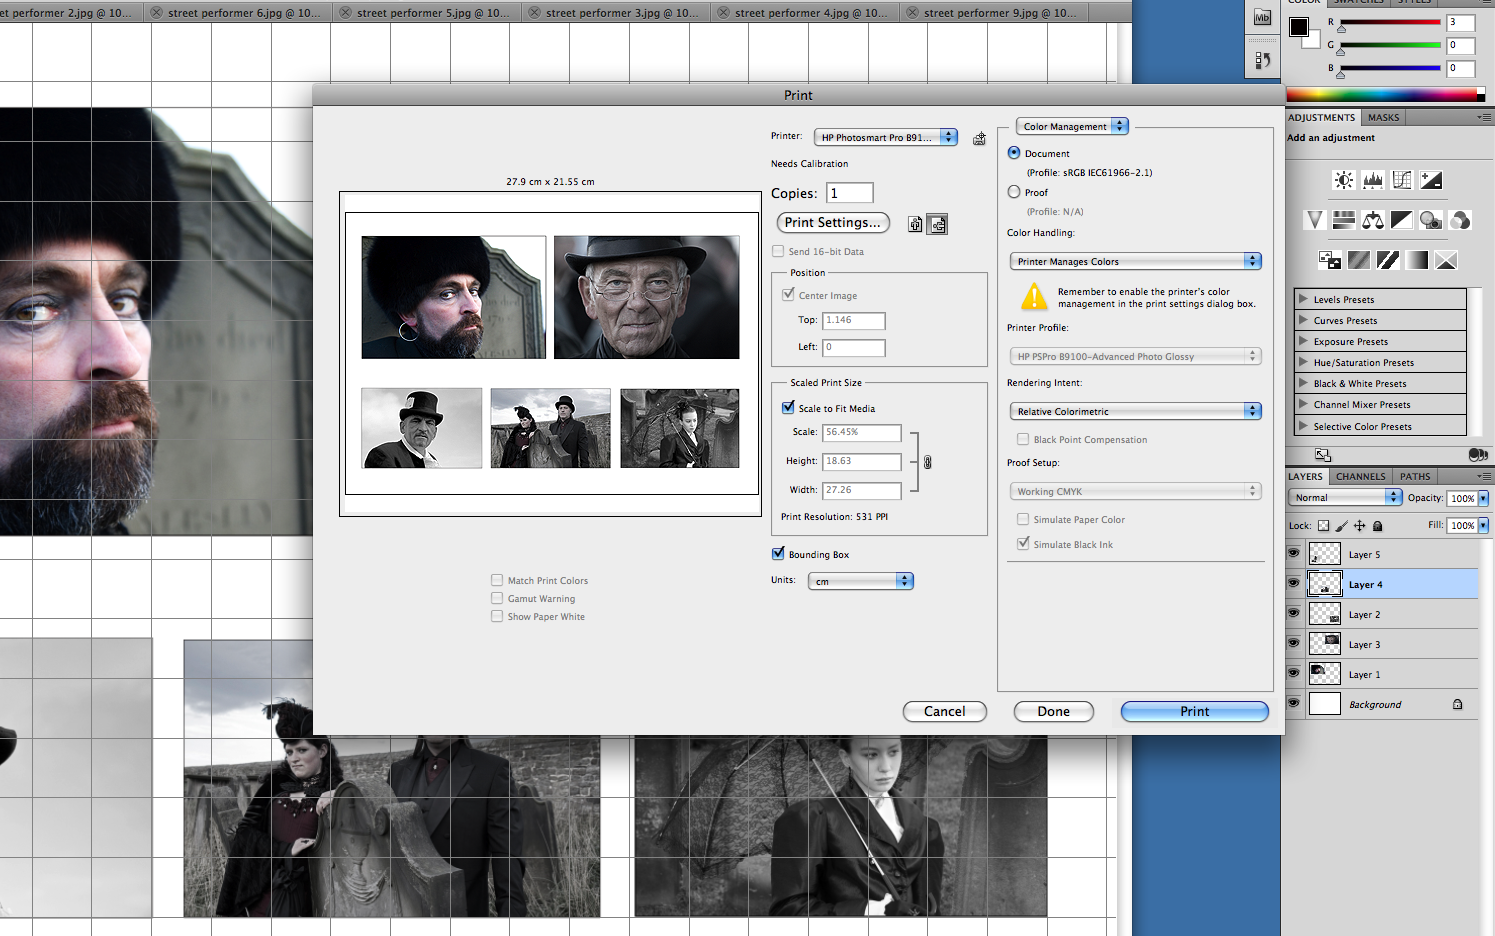


Shown above is a screen grab of one of my test prints that I performed before I printed my final images


Print Images:  

The first step in preparation of getting my photographs ready for print, is to complete final checks such as removing unwanted or obtrusive objects and foreign bodies that would cause distractions in the the photograph.Complete sharpening and finally resize my images for the correct size to print.


My images are for presentation and course work so the standard of print needs to be very high. For this reason I have chosen 300 DPI (Dots per inch) to print my images which will give me a very high quality print for presentation. Choosing this ammount of pixels per inch will add a lot more pixels into the image which will increase,colour,tones,definition and clarity.


I know that using the higher DPI will allow me to blow up or enlarge my images to really high poster sizes etc without the fear of knowing my images will become pix-elated  and out of focus.
300 Dpi is the standard that most printers require nowadays to print large images at a high standard


Using 72 dots per inch is another standard that is used all over the world. This is used to display images and graphics on computer monitor screens and web pages which do not need high DPI's. Using 72 DPI will display an image adequately on any screen or website without pix-elation

After I am satisfied that the colour,tones and sharpness are as equal to what I have seen on my clour monitor,I will then proceed to produce my images


Shown above are some of my screen grabs which show my final printer adjustments before I printed my final images. I configured my images on a blank document in photoshop then aligned them together using the grid tool.

On this occasion I printed 4 images on 1 A3+ print to demonstrate printing and test printing using the college printers

Present Final images:
Theses are my two sets of Final printed images which I am quite pleased about. All printed from the on-line printing company DC Colour labs from Manchester and Burton College A3 printer


At a price of £1.05 for the an A3 print of this quality I find this excellent value for money. I would have preferred to print all of my images on our college printer which does create a little bit finer print than the online option but at the price of £3.50 for an A3 print I had to bare costs in mind and had to settle for the former


The college printing is good and well set up with good equipment but as a student I had to settle for £21.00 for 20 prints as opposed to the college's £70.00


Final10 Street Performers (Portraits)


Final 10 Lake District  Autumn Landscapes (Landscapes)


Tuesday, 4 January 2011

Printing Materials

Printed products and materials.


Printing can be applied to a variety of different products nowadays and the process is not just directed at using paper. Materials include Glass,Wood,Ceramics,Fabric and Plastics.I have highlighted some the most popular materials below

Photographs:

Photographs can be printed on various types and grades of print paper which is specially formulated to except the various inks which are then applied to their surfaces. Surfaces include Gloss,Satin and Matt and the choice of surface will have quite a considerable effect on how the photo will appear on the paper.

Printing paper needs to be chosen carefully and high quality papers are recommended if exhibition results are required. Cheaper papers will fade which is false economy resulting in very poor photographs after exposure to natural or sunlight

There are so many papers out there on the market and the choice has to be right for your chosen photographs. There are exhibition papers at the top end of the market and there are bog standard papers at the lower end. They come in various weights and thicknesses to accomodate for a variety of different uses

Shown below here is a selection of injet papers from the online company Amazon


Photobooks

This is a very popular choice nowadays of showing off your images.Your photos are easily arranged and  Photos are printed into these books which can be used as presents. These are becoming ever popular with Brides and Grooms and have outgrown popularity over the tradinion wedding album. Quality can vary, and paper in the books can vary.For wedding books I would reccomend the higher end prices which use the more expensive quality photo papers. Cheaper books will tend to fade in time


Albums

Not so popular now as in the old days as the photobook seems to be superceding these types of media of showing off your images

Digital photographs of various sizes are printed onto high quality photographic papers which are then compiled and stuck into the album which can then be passed around friends and relatives.
Prints tend to fade over time if good materials are not used. For wedding photogrphy only pay for the highest quality materials which should last for years

Albums tend to be a lot more expensive compared with their modern day counterpart the photo book. Top quality albums are very expensive,an album complete with photos can easily run into hundreds of pounds


Posters


These are high quality large reproductions of your actual photograph. Printing is normally done on a high end top quality Ink jet printers Most posters are printed on one side and left blank on the back, the better for affixing to a wall or other surface. 


Pin-up sized posters are usually printed on A3 Standard Silk paper in full colour. Upon purchase, most commercially available posters are often rolled up into a cylindrical tube to allow for damage-free transportation. Rolled-up posters can then be flattened under pressure for several hours to regain their original form.


Costs now are relatively cheap nowadays and you could expect to pay around £1.00 for a cheap end run of the mill  A3 poster


Shown below is an example of some of the sizes avaiable nowadays


Canvas Prints


Canvas Prints have been around since the early 1990s but have been popularized in recent years by the availability at local photo labs and a number of online services. Canvas Printing is normally done on large format inkjet printers at sizes between 12 inches and 60 inches wide. 

Originally used to create reproductions of paintings, canvas prints now have a strong following in the photographic world as they have been largely accepted as a valid means to display images in the gallery and home. One of the main differences between canvas and other media such as regular photo paper is the texture. Higher quality canvas is made from a tight cotton weave, an emulsion is then applied to the surface of the material so it is ready for printing on a large format inkjet printer. Like digital photographic paper, most companies print at resolutions of 360, 720 and 1440dpi. 


Canvas Prints normally come stretched over a wooden frame which is made up of stretcher bars that have been tapped together and stapled at the back. The frame depth is commonly around 30mm thick but can range from 20mm to 50mm, this helps to give the artwork presence and you can get your canvas printer to bleed and clone your image around the edges of the canvas so you don't lose part of your image on the face of the canvas. The canvases should also come with wedges to help tighten the canvas in case it slackens over time.

Advantages of Canvas Prints

One advantage is you're able to apply a number of extras to a canvas print - such as mirrored edges - where your photo is cloned on the edges of the frame. You can also protect and enhance it will a matt, pearl or gloss laminate of its likely to be displayed in a public space.

Canvas Prints also give your photographs an instant gallery feel to them. They emphasize work within a space and are an affordable way to create an exhibition of works with the minimum of hassle. They have now become widely accepted as a contemporary way of displaying photos and give you an alternative method to the tried and tested traditional picture frames used for photography.

Disadvantages

There are some companies that sell inferior canvas prints. In particular watch out for MDF frames without corner wedges - these give the product a cheap manufactured feel to them and the canvas may sag over time.

Print resolution varies widely - printers using 1440 dpi will provide a finer print quality and superior colour richness than a 720 dpi or 360 dpi print. So go for a printer that has a higher dpi to avoid banding and quality issues.

You can have your canvas prints coated with a varnish or laminate. Generally varnishing with a roller or brush can cause problems as streaking is more likely to occur. A better solution to go for is the laminate, which is applied with a hot press to the print gives more consistent results.

Watch out for cheaper inks. You should always look for archival quality inks that last up to 70 years,you get what you pay for and as these items will be on show for years to come. I would always pay for extra quality with top of the range fabrics and inks


Monday, 3 January 2011

Types of printer

Printers and their technology 


Printing and Digital prints

Digital prints refer to images printed using a digital printer instead of a traditional printing press.
The majority of these printers are controlled by computers and software instructions to tell the printer how to print. The term digital comes from the technology of using "digits" and is based on 1's and 0's


Images  can be printed onto a variety of different media including paper,cloth, plastics, wood, canvas and even ceramics. Accurate colour reproduction and the type of ink used are key to distinguishing high quality from low quality digital prints
Printing materials can vary considerably and there are a vast range out there on the market. Most forms of digital printing are very easy to achieve as the technology and machinery is very fast and efficient and relatively in-expensive

There are various printing techniques available nowadays, I have listed below the most common types of printers and and an outline of their processes

Inkjet printers 


Inkjet printers are the most common type of consumer printers. They are used to print a variety of different products on a variety of services.The inkjet technology works by spraying very fine drops of ink on a sheet of paper. These droplets are "ionized" which allows them to be directed by magnetic plates in the ink's path. As the paper is fed through the printer, the print head moves back and forth, spraying thousands of these small droplets on the page.

While inkjet printers used to lack the quality and speed of laser printers, they have now become almost as fast as laser printers and some can even produce higher-quality images. Even low-budget inkjet printers can now print high-resolution photos. As the quality of inkjet printers has improved, the prices have continued to drop. However, for most people, refilling the inkjet cartridges a few times will often cost more than the actual printer itself.


This type of printer is also used by commercial printers for very large posters and advertising work and is also use by home computer users to print out course work or spreadsheets and photographs


My Printer and other methods of printing


Shown below is a photo of my Canon ip4300 inkjet printer which produces a maximum A4 colour or black and white print. This is an excellent printer which I have owned for about 3-4 years and all for £49.00. Out of a score of 10 I would rate this printer 9/10. It really does produce really exceptional prints that I think are second to none


Every time I print a new batch of photo's I first calibrate my printer by running the print calibration program that is built into the driver software. This alligns my print heads,removes blockages,cleans, and keeps the ink  flowing evenly through the print head nozels


If the process is not performed on a regular basis,streaks,banding and fading prints can occur


The only downside I have with this printer is the price of ink. My printer uses 5 ink toner cartridges,blue magenta,yellow,cyan and black but the cost of replacing these inks is approx £50 which is the same price of the printer.


I always buy the original Canon ink cartridges and the colours that these inks cartridges reproduce are excactly the same as what I see on screen. I have used cheaper none Canon brand ink cartridges but they produce less superior results,with wishy washy colours and colour casts.


I can normally produce  about 20 A4 prints from a full set of Canon inks and dependent on what paper I use to print on this works out at about £3 per print.


This does seem a little expensive compared to the prices of the online printers which can produce the same image at a fraction of the price.


However you can not always guarantee the quality,colours and quality of this type of printing and the end result will always be printed as a jpg image
Laser Printers


A laser printer is a printer that uses a focused beam or light to transfer text and images onto paper or other matrerials. As  paper passes through the printer, the laser beam fires at the surface of a cylindrical drum called a photoreceptor. This drum has an electrical charge (typically positive), that is reversed in areas where the laser beam hits it. By reversing the charge in certain areas of the drum, the laser beam can print patterns (such as text and pictures) onto the photoreceptor.

Once the pattern has been created on the drum, it is coated with toner from a toner cartridge. The toner is black in most cartridges, but may be cyan, magenta, and yellow in color laser printers. The positively charged toner clings to areas of the drum that have been negatively charged by the laser. When the paper passes through the printer, the drum is given a strong negative charge, which allows the toner to transfer and stick to the paper. The result is a clean copy of the image written on the paper.

Because laser printers do not use ink, they have less image smearing problems than inkjet printers and are able to print pages faster. While laser printers and toner cartridges typically cost more than inkjet printers and ink cartridges, most laser toner cartridges last a lot longer than ink cartridges, which makes their cost per page cheaper For this reason, businesses tend to use laser printers, while consumers are more likely to use inkjet printers. Laser printers typically have a resolution of 600 dpi (dots per inch) or higher.


Solvent Printers


These printers are usually ink jet printers which are very large in size and are able to print onto very wide or large items,they can be costly to buy but are mainly used for commercial printing


They use a solvent mixed into the ink which enables printing onto a whole host of products for commercial use which is also waterproof. The print heads can be changed to except water based inks or solvent based inks. These printers will print onto most surfaces including glass,wood,ceramics,fabrics,plastic,large posters etc

Shown here below is a mixture of some of the solvent printers that can be purchased nowadays


Thermal printer 

A printer that uses heated pins to "burn" images onto heat-sensitive paper. The pins are electrically heated and brought into contact with the specially treated paper easily, instead of with great impact. The coating on the paper discolors when heated in this way. These printers, used in calculators and many fax machines, are inexpensive, but produce low-quality, low resolution print. They are however, quiet and fast as they print.

This type of printer is still in use today in many ATM bank systems but the technology is now becoming more and more dated and successors are superceding this type of printing as we speak


Dot Matrix Printer


Dot Matrix Printers are still used today but not as much as in the old days.They are mainly used  for big batch printing runs and can print on a lot thicker paper than ink jets and laser printers 


This type of printer printer uses hammers and a ribbon to form images out of dots. It is widely used to print multipart forms and address labels. Also known as a "serial dot matrix printer," the tractor and sprocket mechanism in these devices handles thicker media better than laser and inkjet printers.


The dot matrix printer uses one or two columns of dot hammers that are moved across the paper. The hammers hit the ribbon into the paper, which causes the ink to be deposited. The more hammers, the higher the resolution. For example, 9-pin heads produce draft quality text, while 24-pin heads produce typewriter quality output. Speeds range from 200 to 400 cps, which is about 90 to 180 lpm.


Dot matrix printers fitted with a tractor feed are commonly used for printing continuous multi part forms and mailing labels. The tractor feed contains a sprocket that grabs the perforated holes at both sides of the form and pulls it through uniformly.


The downside of using these printers are they are very noisy and their costs have been overtaken by cheaper more efficient Inkjet and laser printers
The technology in these printers is very old and it's only time before they are condemned to the technology scrapheap


Printer Calibration

What is printer calibration


This is the basic set-up and configuration of your printer and is not to be confused with Computer Monitor calibration.These two things are totally separate articles and both require different calibrations.


Printer calibration is the process of making the printed image match the image shown on a computer display. A computer display and a printer don't always produce the same image and colours for a few different reasons:


Firstly, print ink dots naturally overlap a little bit on paper, while the pixels on displays do not overlap.


Secondly, printers commonly create images slightly darker than computer displays.


Thirdly, printers mix four pigments to create colours (cyan, magenta, yellow, and black), while displays contain pixels of only three colours (red, green, and blue).


Different types of paper will affect the final printed image as they adsorb ink in different quantities which result in different colour tones and casts. Computer monitors remain virtually constant if not adjusted ant these displays don't have such issues as printers.


Printer Calibration

There are two methods of printer calibration which are important in getting an exact reproduction when sending the message to print from the computer. The two options are known as Visual Calibration and Mechanical Calibration.

Visual Calibration of the Printer

Printing a test image which has many colour tones and values is important. Colour bars, photos and blocks of colours which will be printed in the final image should be used. With a visual inspection of the printed output, the user will then use the available software tools that come with the printer before sending the image to print. The controls can be adjusted to provide the optimal printing options for the printer with some trial and error.

Mechanical Calibration of the Printer

Some printers are able to print out test images with their advanced tools. These test images will be a series of lines and designs which will show the best options to choose with the printer to calibrate the printer heads for accurate printing. The person that will be calibrating the printer through the software will need to visually inspect the image and choose the options which are best to mechanically adjust the printer to have a better printing output. Once complete, the printer will have improved output.

Calibration using Printer Driver Color Controls

Nearly every printer on the modern market will come with a printer driver which has been developed for the printer or family of printers that you will be using. The printer driver is a powerful tool which can select specific options for printing which can adjust the output of the printer.
Advanced settings within the printer should be able to allow the user to choose the media type that the print will be made on such as paper or material. The type of ink that is used can also be chosen through this option to be more specific to the print job that is being performed.
The print quality can be chosen through the advanced settings as well. Some printers allow the selection of the intensity of the half toning that is done with colour and black inks used by the printer.
Some printer drivers come with their own colour management properties which can be changed manually to produce a much better print output. 
The brightness, contrast, saturation, amounts of cyan, magenta and yellow are often options that can be changed in the advanced settings of most modern printers. Even more options may be available with higher quality printers and updates in printer drivers.
Through the advanced options in a printer driver, nozzle checks and a variety of tools can be used to make better prints possible through the use of the printer hardware.

These are some of the screen grabs taken when I calibrate my Canon 4300 printer


The grab above shows my properties section from my Canon printer. This is the area where I can perform test prints and use all the different settings available to calibrate my printer


This grab above shows all the different shades and tones taken as a test print when I calibrate my printer


What is an ICC Profile?
Another useful tool I use when setting up my monitor and printer. International Colour Consortium (ICC) profiles are a type of cross platform colour management system which can properly adjust the colour in images/photographs with the optimal colour spectrums for viewing/printing.They provide a consistent colour between the monitor and the printer. I use these this type of profile for printing a lot of my images which give a truer match of what is printed to what I see on my computer monitor


Using ICC profiles


The link below shows a video from Youtube which details how to print a photograph with the correct colours, tones and settings using an ICC profile which match exactly what is seen on your monitor screen


http://www.youtube.com/watch?v=gnxo0Ffp3KQ


After calibration of a printer it is also important to next calibrate your computer monitor so they both work in harmony together


Sunday, 2 January 2011

Photography day out for hands on experience


Here a few shots of a day trip out to Bristol over the Christmas Hols.We regularly organise class day trips out to various locations around the country to gain more experience and a better understanding of photography and using our equipment.

The lighting conditions were dreadfull,very gloomy  grey and overcast. As dark fell we did manage to take a few decent pickies,shown below are some of them.

A nice day out with nice friends 


Night shot of Bristol Docks


Jim borrowed Eric's new fish eye lens,think he over did it


Something strange about them firemen?


6,400 ISO hand held,oh the joys of Digital !


Met these five weirdo's in the docks,think they were performing in a local Pant-ermine


A bit of triv

The bridge is named after "Pero" a slave who lived from around 1753 to 1798, arriving in Bristol probably from the Carribean  Island of Nevis in 1783, as the slave of the merchant John Pinney (1740–1818) at  5 George street.
The bridge is composed of three spans; the two outer ones are fixed and the central section can be raised to provide a navigation channel in the harbour. The most distinctive features of the bridge are the pair of horn-shaped sculptures which act as counterweights for the lifting section, leading it to be commonly known as the Horned Bridge.


Here,s a link so some nice old pickies for Bristol

Friday, 24 December 2010

Organisation of a photography trip to Bristol

Christmas Photography Trip


Had a chat with Eric last night we pencilled in Wed next week for the Bristol trip as rain is forecast on Monday. Just checked the weather for Bristol on Wed, 8 degrees, taking me shorts


Lots of Photo opps and competition stuff here,docks,museums,town,Christmas lights,pub interiors and the zoo,something here for everyone


Eric and I will both take our cars so plenty of spaces and room available
Usual requisites,sense of humour,beer money,any decent camera but remember to put a film in!


Blog,text, Me or the Gaffer if your up for it!!


Merry Christmas