Showing posts with label (310)M2. Show all posts

Thursday, 5 May 2011

Final 10 Portraits (Street performers)

Shown below are my final 10 Street Performers (Portraits)

I have chosen this subject to compound my knowldge and skills of photogrphing  this subject

These images were all taken at whitby Gothic Festival a twice yearly event that attracts street performers,exhibitionists and photographer's from all over the country

Friends and I spent the whole day there as there was anabundace of really good subject matter at hand all on one day to photograph

I photogrphed all of my images here on a suprisingly sunny warm day on the 30th Of Oct 2010. The lighting was a little tricky at time because the sun was in and out of the clouds for the majority of the day

Alot of my images were captured using my Canon L series 70-210 zoom lens taken at vaious distances and at different angles all throught the day.All of my subjects were very friendly and most were exhibitionist's.All of them were really friendly people and really obliged when asked if I could take their photograph which is a bonus for any photographer. I have learnt a lot this year photographing these street performers as my portrait subject. I was a little shy at first approaching a total stranger and asking to take their photograph but now feel this has given me an abundance of confidence to approach a total stranger and ask for a photo. I Intend to go again next year to this event where I will photograph my subject a little differently


Wednesday, 4 May 2011

Final 10 Lake district Autumn Landscapes (Landscapes)


Final 10 Lake District Landscapes

Shown below are my final 10 Lake district Landscapes which I took last Autumn on a holiday to the lakes in Cumbria. I took a bout 300 images on the holiday. My Tutor Steve and I picked the best 20 images from the 300,then finally selected the best final 10 images shown below for my coursework


Sunday, 6 February 2011

Technical Evaluation of my final prints

I decided to have my final images printed on-line by a a reputable Photo Printing company D C Colour labs from Manchester. I have used this company many times before and overall I find their printing to be very good with a very reliable service. I have discussed this company in more detail in some of my other blogs in the module (310) photo imaging output 


On receipt of my images I gave them a thorough inspection for quality and overall condition. I was fairly pleased with the overall printing of the images. I would award them 7/10 on the overall printing of my photos. I awarded them a score of 7 because overall for the price of £1.05 for an A3 print I consider this was fairly good value for money and  I wouldn't expext the quality to be any better at this price

To evaluate the prints I would say that the images are a little on the dark side and are not exactly the same brightness as seen on my pc monitor. They lack a little vibrancy and the clarity is not perfect even though I did I did download and send my images for print using the print company's ICC profile.There are no banding marks evident, no surface marks or scratches. Colours seem to be a fairly true to my originals and there are no colour casts evident. The paper they use is a Lustre paper which seems to display the image with a smooth texture. With choosing a print size of A3 obviously the images look better when viewed from a distance and seem a little soft on the focus when viewed close up
The company gave a requested image size of 4950 X 3510 pixels to print an A3 image with no cropping evident. I configured these dimensions in Photoshop and then saved the image files with their recommended ICC profile and dimensions

Shown below is my image loaded into the company's software before the image is processed for print. You can choose image size,papers,quantity etc from here


The image above shows a part of DC's printing software before the image is finally processed before print. This is a very important part of the software because you can see here how your final image will look before being printed and make final adjustments to get the best out of your prints

On inspection of my final prints I did notice that a couple of my images seem to be a liitle stretched an pix-elated even though I had sized and saved all of my images to the correct dimensions recommended by the company. I was mistified by this and have been analizing this problem over a couple of days. On closer inspection I did find the route of the problem. The two images that were pix-elated had been cropped earlir in Phtotoshop by myself to different pixel dimentions. When I resized them in Photoshop ready for print to the companies given dimensions,the images were being stretched which resulted in pix-elation which also resulted in the prints having a a squashed appearance. I will be aware of this problem next time I send them to print and found this to be a good learning curve


For speed and delivery I would award the company 10/10. I uploaded my images and placed my order 10.00pm on a Sunday night and received them the1st thing on the following Tuesday, approx 34 hours for the whole process,brilliant!!


The overall cost of producing my final 20 images did come into the equation. At D C Colour labs the overall cost to print these 20 images was £25.00 including delivery. In Comparison,to print the same amount of images in college to a similar standard would have cost me £80.00 including test prints


Overall I would have preferred to print my images using the college's printer because I would have had full control of colour management and the advantage of printing my images from a Raw\Psd file which retains more clarity and better definition. However costs won over clarity on the day and for the service they provide I find them excellent value for money

Friday, 21 January 2011

My home printing and other methods of printing

My Printer and other methods of printing

Home printing

Shown below is a photo of my Canon ip4300 inkjet printer which produces a maximum A4 colour or black and white print. This is an excellent printer which I have owned for about 3-4 years and all for £49.00. Out of a score of 10 I would rate this printer 9/10. It really does produce really exceptional prints that I think are second to none


Every time I print a new batch of photo's, I first calibrate my printer by running the print calibration program that is built into the driver software. This alligns my print heads,removes blockages,cleans, and keeps the ink flowing evenly through the print head nozels

If the process is not performed on a regular basis,streaks,banding and fading prints can occur

The only downside I have with this printer is the price of ink. My printer uses 5 ink toner cartridges,blue magenta,yellow,cyan and black but the cost of replacing these inks is approx £50 which is the same price of the printer.

I always buy the original Canon ink cartridges as the colours that these inks cartridges reproduce are excactly the same as what I see on screen. I have used cheaper none Canon brand ink cartridges but they produce less superior results,with wishy washy colours and colour casts.

I can normally produce  about 20 A4 prints from a full set of Canon inks and dependent on what paper I use to print on this works out at about £3 per print.

This does seem a little expensive compared to the prices of the online printers which can produce the same image at a fraction of the price.

However you can not always guarantee the quality and exact colours of online of printing and the end result will always be printed as a jpg image. I did consider using my home printer to produce my images for my coursework but it only prints at a maximum size of A4. After a discussion with my tutor Steve we agreed that a size of A3 was more desirable size for presentation and to meet the course criteria

For the reason above I have produced my two sets of final images for this course using the two different print processes as outlined below

Printing Process N0 1..........Online printing.


I have produced a set of on-line printed images that were printed in the Jpg file format. Unfortunately I would have preferred to print in the raw/psd format which produces a lot finer,clearer image than a JPG. Unfortunately not many on-line printers support this type of format


DC Colour labs of manchester


This is the company that I used to print the majority of my photographs for this course. An online print company that have a very good reputation for speed,quality and reliability.They produce a vast array of different printed products that are very reasonably priced. These are a few of my screen grabs from the company


This is the companies's web page


Shown here are the 3 different printing interfaces that can be used to produce your images.Dependant on which interface you use your prints can be easily customised to suit individual requirements


Shown above are the various print sizes and costs from this online company


Show below are some of the different papers that DC offer customers for their printing. I always use the second paper down Fuji 570 which is a Lustre paper and always produces very good outstanding results

Shown here are the different print sizes that the company uses and their recommended pixel sizes


Printing Process N0 2        College inkjet printing


This is our college Hp Photosmart A3+ printer

This is the second  printing procces I have used to print my images for this course. This method of printing allows me to have full control and management over the whole print process of my images

I can select any grade and type of print paper of my choice to suit different types of images as opposed the the online printing companies which only gives a choice of 3 papers

Printing my own images also gave me a choice of what file format I choose to have my images printed in. I prefer my images printed from the raw format which gives better clarity, colour and full control over the parameters that can be applied to my images

I loaded all my images straight into Photoshop in the Raw format which I then transformed and converted into the PSD format. After manipulation in Photoshop I saved my images in the PSD file format which keeps all of my adjustments,layers and sizes which can be worked on again at a later date


I have covered all of the above topics in another one of my blog's entitled "Print Workflow"


Friday, 14 January 2011

Print Workflow

 Print Workflow 


I have produced two final sets of 10 thematic printed images for the modules of this course. 
This is an outline of the print workflow that I have used to produce my images


Creation of my images:
I have produced  two sets of thematic photographs as requested in our module briefs. These are as follows:


Set 1 (Landscapes) The Lake district in Autumn
Set 2 (Portraits) Street Performers


The photographs were all taken by myself with my Canon 7D camera with various lenses and were all taken in the raw format.


I choose this type of format for my images because it gave me the best possible scope to manipulate my images. This format provided me with the best possible quality,tones,colours and clarity and in my opinion is 2nd to none. Using this format allowed me to completely transform, sometimes, completely lifeless dull images, into very acceptable photographs which would not be at all possible using other file types such as jpg


Using the raw format enabled me to use very large image files at roughly 20 MB per photograph which retains all details as when the photograph was captured. This is not a compressed format,so maximum definition and clarity was kept in my images. I then make 3 copies of my images. Copy one on my storage media hard drive. Copies 2 an 3 are copied to DVD discs as a back up solution for archiving


Catalogue my images:
After image capture I used the Adobe software "Bridge" to organize and catalogue my images
I used the software Adobe Bridge to catalogue my photographs after they have been taken. I  first loaded all of my raw files into this software(approx 500 images)where I viewed,graded and remove unwanted undesirable or out of focus images.

I then rated my images using a star rating system which is built into the software which enabled me to easily group and rate my photographs for final selection by labeling each image with a 1-5  
star rating


Shown below is a screen grab from my Bridge software which shows the star ratings given to my photographs which makes life far easier when I want to select a group of images all with the same ratings


Once graded with a star rating It is then very easy to display just 4 or 5 star images instead of trawling through all of your images to find your best shots


Selection of images:
Over the duration of this course I have taken approximately 500 images for my course work. I have submitted  2 groups of approx 20 images for final approval that my tutor and I have agreed on for the final selection of images to be printed.

I then then narrowed down  my final 10 images which will be going to print later in the course. My tutor and I have critiqued my final selection of images and replaced less desirable images with more suitable images that fit the criteria of the brief of the course


Post Process Images:
Next I loaded all of my final 20  images into Photoshop where I worked on them to embellish and enhance their appearance. I used Photoshop CS3 at home and CS5 in college to post process my images before going to print


This is the stage of the workflow where I manipulated all of my images before going to print. Some of my images needed certain processing to make them look their best. I changed lighting,tones,white balance,colour and sharpening. I set up"Batch processing" a technique in Photooshop or Bridge where  a group of images are selected and then worked on as a "batch" instead of working on them individually which would take hours to complete. This allowed me to process a large group of photographs which all have the same characteristics as one another. In this way  they all  had the same process applied to them for eg, image size and cropping


This grab shows how I set up an action in Photoshop to manipulate a whole batch of images before they were batch processed 


I set up an "action" within Photoshop which enabled me to "Batch Process" most of my images. I applied this process to all my images to change image size and cropping which saved altering every single image one by one which would have taken hours instead of minutes


Image sharpening and final checks:
I set up another "Action" within Photoshop that  applied a final sharpening of 15% to all of my images after post processing them.This, I find gave my images a final burst of sharpness and clarity. I find giving over 15-20 % sharpening to my images starts to degrade the images and adds  a more grainy effdect which is not pleasing to the eye. I used the unsharp mask filter within Photoshop for this process. I gave a last visual check to my images then gave a final check to remove any unwanted or obtrusive objects that would be shown in the final print


Paper Selection:
There are a large variety of various printing papers out there on the market for photographs
The major ones being Gloss,Satin and Matt. Different papers suit different photographs


I have used two different print sources to print my images for this course

One source is from an online printing company(DC Colour labs) that specialises in photogrphic printing,the other is from our college where I am studying this course. They both used inkjet printers for printing my images and I would say that the college printing is slightly better than the on-line printing.


The main reason for this, is printing from college allowed me to print using PSD files straight from Photoshop which is basically my raw file with which is a much more refined file format that a jpg.The online printing was good but they only print images from Jpg's which loose quality and clarity due to its compressed file format

I have used two different types of paper to print off my images. . 


Paper N0 1- (College Printing)  A3+ HP Satin/Gloss 250 g for college printing. I have used this paper and printing method to produce my test prints but the costs build up easily at £3.50 for an A3+ image


A3+ paper is the only size available to students.This paper produces very fine crisp clear results
with very good tonal and colour renditions. However, small banding lines are  produced by the printer on close-up examination are evident but the banding is not noticeable when the paper is viewed from over 1 foot or more away from the paper


Most of my images will be viewed at greater distances so the tiny banding marks will not be at all evident


Advantages of this printing process and it's paper


Clarity: Finer image detail
Print from Raw: Files printed straight from photoshop
Control: Having full control of how the print is managed and printed


Disadvantages: Slight banding at closer inspection. Costly at £3.50 per print


Paper N0 2 - (On-line printing, DC colour labs) A3 Fuji dp11 pro Lustre paper
This is a very nice paper giving a very smooth texture with good clarity with rich colours. However these prints always tend to be printed a little more on the dark side than what is actually viewed on a computer screen


Advantages of this printing process and it's paper


Cost: Only £1.05 for a A3 print
Speed: Order one day and deliver the next
Reliability: Great reliable service with consistent results
Copyright: Title and date printed on the reverse of the image 


Disadvantages: Only able to print from JPG's


I have used both of these papers before and both give pretty pleasing results but overall the college printing and paper have the edge over the online printing. This is mainly due to richer more vibrant colours, better clarity and a smoother texture on a thicker quality paper


Printer Setup and calibration and test prints:


This is the college A3 HP Photosmart Pro B9100 printer that I used to print some of my images for my course work


Before I begun to produce my test prints, I tested the calibration and set-up of the college Printer an HP Photosmart Pro B9100 series to make sure the printer was working fine. This involved making sure that ink supplies were sufficient and ink was flowing correctly through the print nozels. I carried out this process to check there was no fading,streaking or banding evident before I produced my final prints.


Shown above is a screen grab from our college printer and the utility that shows the actual remaining ink levels of the ink cartridges


To carry out the above checks I  produced a print calibration test page which automatically cleaned my print head nozels for me. This calibration  process also aligned and adjusted my print head nozels automatically. This procedure reduces banding and streaking marks that can be seen on prints that have not been calibrated


Shown above are all the processes that I performed before I printed my final images. Performing these routines assures printing will be at it's optimal best that the printer can perform


Printing a test pages shown above is essential, it will show streaking,banding and white lines if the printer is not set up correctly. The test page also allows me to check colours,clarity and sharpness which helps to confirm that the test print is pretty much what you see on the computer monitor.A very useful tool

I always carry out the above procedure before I complete any kind of printing in college which is an essential step in my print work flow


This is the stage of the work flow where I carry out all of my checks for potential printer problems. 
Some of the problems have been banding,streaking and fading in my images and blocked printer heads. These are all common printer problems which occur regularly and can usually be remedy'd by simple regular maintenance routines


I carried out all of the print problem repair routines listed above before I printed my final images.
This assured me I would have a problem free print workflow of my final images


My Image test prints: 
I will normally make at least 2 test prints of my own images to make sure that my colours in my test prints match as near as possible the colours and tones that I see on my colour computer monitor.


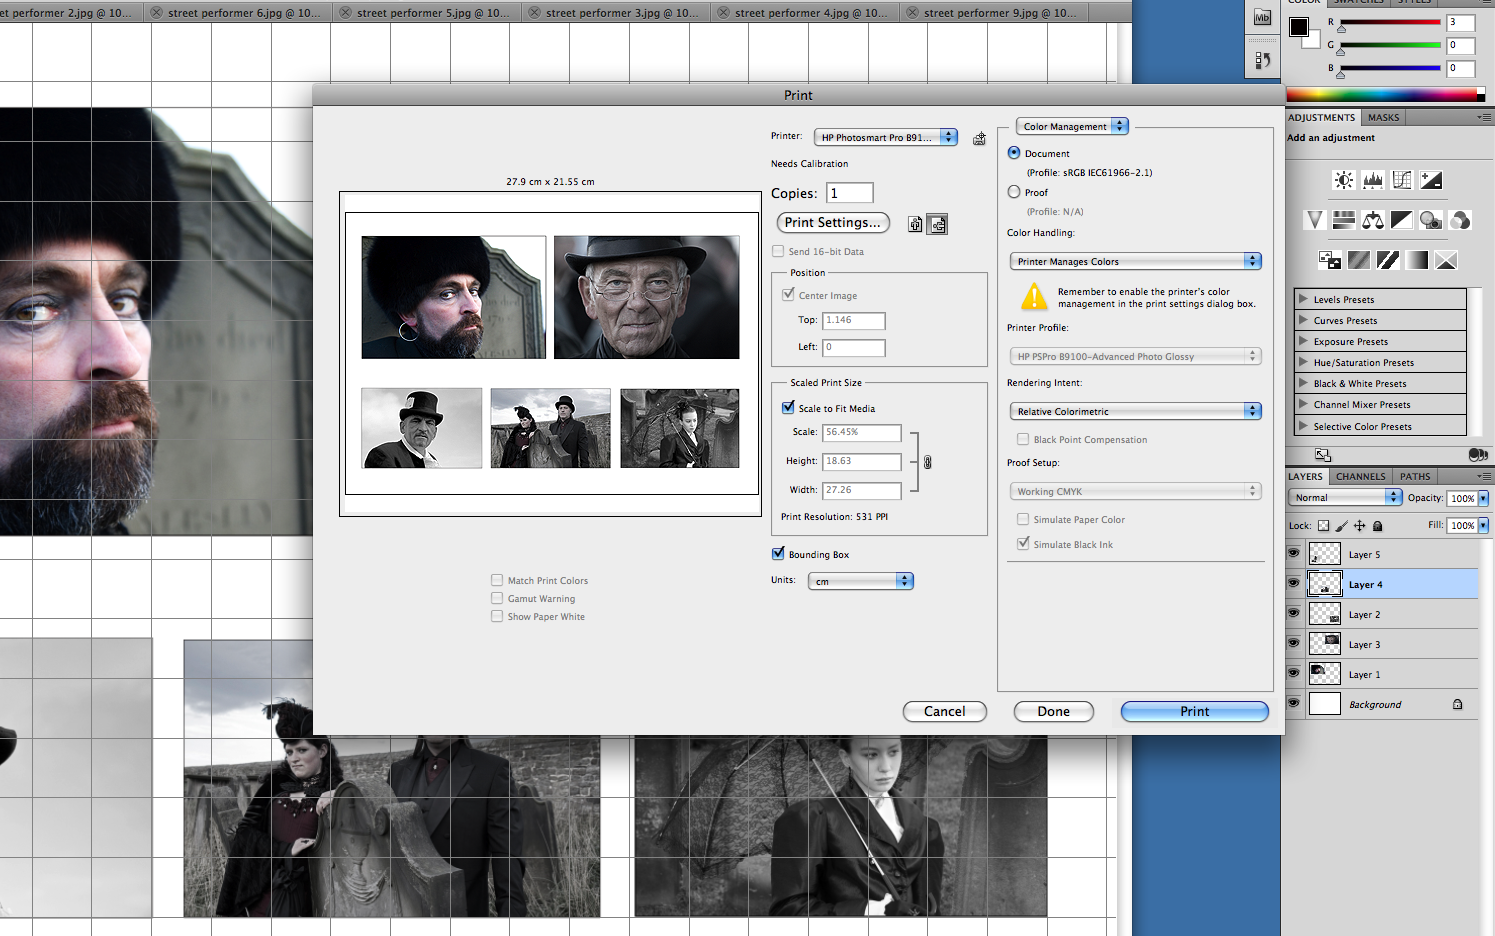
Shown below is one of my test prints that I have produced before I printed my final images. It shows the printer interface settings. This is the part of the printing process which enables me to manage printer properties, such as changing colour,profile,size and print parameters


Shown above is a screen grab of one of my test prints that I performed before I printed my final images


Print Images:  

The first step in preparation of getting my photographs ready for print, is to complete final checks such as removing unwanted or obtrusive objects and foreign bodies that would cause distractions in the the photograph.Complete sharpening and finally resize my images for the correct size to print.


My images are for presentation and course work so the standard of print needs to be very high. For this reason I have chosen 300 DPI (Dots per inch) to print my images which will give me a very high quality print for presentation. Choosing this ammount of pixels per inch will add a lot more pixels into the image which will increase,colour,tones,definition and clarity.


I know that using the higher DPI will allow me to blow up or enlarge my images to really high poster sizes etc without the fear of knowing my images will become pix-elated  and out of focus.
300 Dpi is the standard that most printers require nowadays to print large images at a high standard


Using 72 dots per inch is another standard that is used all over the world. This is used to display images and graphics on computer monitor screens and web pages which do not need high DPI's. Using 72 DPI will display an image adequately on any screen or website without pix-elation

After I am satisfied that the colour,tones and sharpness are as equal to what I have seen on my clour monitor,I will then proceed to produce my images


Shown above are some of my screen grabs which show my final printer adjustments before I printed my final images. I configured my images on a blank document in photoshop then aligned them together using the grid tool.

On this occasion I printed 4 images on 1 A3+ print to demonstrate printing and test printing using the college printers

Present Final images:
Theses are my two sets of Final printed images which I am quite pleased about. All printed from the on-line printing company DC Colour labs from Manchester and Burton College A3 printer


At a price of £1.05 for the an A3 print of this quality I find this excellent value for money. I would have preferred to print all of my images on our college printer which does create a little bit finer print than the online option but at the price of £3.50 for an A3 print I had to bare costs in mind and had to settle for the former


The college printing is good and well set up with good equipment but as a student I had to settle for £21.00 for 20 prints as opposed to the college's £70.00


Final10 Street Performers (Portraits)


Final 10 Lake District  Autumn Landscapes (Landscapes)