Saturday 29 January 2011

Management roles,structures,situation management


Running a photography business a photographer must be responsible for the whole management of the company and also manage the different structure and roles within the  business. You have to be a very versatile person to full fill the various roles associated with this business. If he or she is the only person running the business then they will be responsible for all of the different roles that a small business needs to function properly


I have outlined the major roles that a single photographer will have undertake to make their business successful


The Managing Director:
Responsible for the everyday running of the business making major key decisions,financing the company,keeping the company afloat.Looking ahead in to the future to outwit competition and make sure that the company remains competitive


The Manager:
Usually controls the management of staff and resources of the company. Makes sure the company runs smoothly without any hiccups. Make sure deadlines are adhered to.Responsible for organisation of studio hire,venues, props, models and equipment and making sure everything runs smoothly. Buying equipment and managing resources while sticking to tight budgets and deadlines.


The Administrator:
Responsible for the everyday upkeep of all correspondence and finances associated with the business,sending out appointments,filing documents,typing spreadsheets,sending payments,cheques etc


The Salesperson:
In this role the photographer is responsible for finding work and marketing the company. Advertising the company or services to produce more work.Producing promotional material such as advertising,flyers,chasing up leads of potential customers


The Photographer:
Responsible for the production of the images for the customer. Needs to be very alert and quick thinking with major decisions taken at an instant. This role entails many roles within a role. For example,wedding photography, managing equipment ,organising the shots, organising people telling them where and how to stand, managing all his equipment and lighting on the day
Also responsible for post processing of the images and making sure that they are produced exactly as the the project brief requested


The Customer Services Manager:
Responsible for problems and complaints that the customer may have. Must be able to investigate complaints and resolve issues that may occur quickly and efficiently. Keeping the customer happy at all time is a very important part of the business for future orders and continued success


The Quality Controller:
The need for quality in the business of photography is second to none.The end product ,the photographs,need to be in pristine condition and produced exactly to the customers specifications and requirements. Quality needs to be controlled right from the start of image capture to the final prints. Producing a good  end product  at the right price will always bring in repeat orders and continuing work and also help to market the business in the future


Situation management


Situation management can be a large concern for the photographer and there are a whole lot of varying issues that need to be taken into consideration.There are many problems that may arise on the day when the the photographer records the images.The photographer must therefore have contingency plans in place to allow for when the inevitable problems happen.

The photographer must envisage these problems before they happen and produce very good managerial skills by having solutions ready in place when things do go wrong


When problems do occur the phtographer must identyfy these problems quickly and find solutions as soon a possible. The problems need to be reviewed and measures need to be put into place to prevent them happening again in the future 

Problems will always occur so the photographer needs to look into how to stop them re-occuring or prevent them happening in the first place. 


I have listed below some of the most common problems that may occur while photographer's are going about their everyday business


If travelling travelling far and wide to different locations,hotels may be double booked so new accommodation must be found which may be possibly more expensive than originally thought which could all add to the photographers costs


A photographer may loose photographs,memory cards, a wedding album may be lost or stolen. so good management procedures must be always be in place to allow for these catastrophes
Backups of these types of media are paramount

Losing or breaking the camera is a major concern to the photographer as these are the tools of his trade A second camera is paramount and possibly even a third may be needed to accommodate for breakages or malfunction


Models not turning up for the photo shoot is another problem. The model may become ill during the shoot.The photographer needs to have backup models on standby to help shoot the images. If a customer is waiting on a set of images time is very inportant so management of these resources is paramount


The weather can always be a nuisance to the photographer and cannot be relied on or predicted in this country. If shooting out doors in this country he must allow for possibly shooting the images inside as the weather can turn in a matter of minutes. A good photogrpher will always keep an eye out on the weather forecast before planning a shoot


The management of all of these problems must be considered and to stop them re-occurring or even preventing them in the first place.The shoot may take a whole lot longer than anticipated to produce the desired images,so contingency plans must be considered and time management plays a major factor in the photographers life


Saturday 22 January 2011

Landscape Techniques

Fill the frame for dramatic effect
Look carefully at the picture you’re framing before you click the button. Experiment by moving the camera up and down, side to side. Tilt the camera to various angles and see what it shows you. Fill the frame with the object that interests you most. If your digital camera has an LCD screen, you can use it to improve your sensitivity to the entire scene.
Change your perspective
There’s no need to shoot everything from a standing position. Sometimes sitting, crouching or getting higher can produce a more interesting shot.
Colour
The presence of colours is probably the best hint of a great photography potential. Red is the most pleasant color for the eye. If you manage to find this color or a hue in nature, even in small spots, set up your tripod and prepare your camera. If you also pay attention to the position of these colored spots in the image, it is very possible that you obtain a good picture.
For increased drama, you can easily convert colour photos to black and white by using your favorite image-editing program. With some camera models you can even do this in the camera before downloading the image to your computer. Once the image is on your computer, you can use your image-editing program to adjust contrast and brightness. Silhouettes look terrific in black and white, as do old buildings. The effect adds drama.
Clouds
The most beautiful ones are the clouds above the horizon, close to the landscape area that you have in view. At twilight or crack of dawn these clouds may have astonishing colors. They may create a dynamic and complementary center of interest that may give intensity to the center of interest in the picture.
Calmness
A calm, windless atmosphere may sometimes be very useful for the landscape photographer. The wind alters flowers, leaves, trees, grass, lakes etc. For these situations It would probably be more cautious to use a tripod.
Weather
Bad weather may be very good for taking pictures. Fog, mist, snow or rain may give fantastic power and impact to some every day landscapes.
Geographical position
Whenever possible, try to place yourself at north or (especially) south from the landscape you want to take pictures of, because you will thus benefit from lateral light. This sort of light emphasizes the relief and textures, the shapes and shadows.
Close-up
The best landscapes are usually those containing a powerful close-up. Trees, bushes, rocks, bunches of grass or moss, dunes of sand, flowers, almost every subject may be used to create a particular depth in the image. Such a detail may give a three-dimensional illusion, which is very important for the impact of the image.
Reflections
Peaceful waters offer perfect occasions for taking mirror images. This effect may be used in order to double the beauty of a landscape.

Friday 21 January 2011

Additional portrait/street performers images

Shown Below are some of my additional portrait/street performer practice images

Under construction


My home printing and other methods of printing

My Printer and other methods of printing

Home printing

Shown below is a photo of my Canon ip4300 inkjet printer which produces a maximum A4 colour or black and white print. This is an excellent printer which I have owned for about 3-4 years and all for £49.00. Out of a score of 10 I would rate this printer 9/10. It really does produce really exceptional prints that I think are second to none


Every time I print a new batch of photo's, I first calibrate my printer by running the print calibration program that is built into the driver software. This alligns my print heads,removes blockages,cleans, and keeps the ink flowing evenly through the print head nozels

If the process is not performed on a regular basis,streaks,banding and fading prints can occur

The only downside I have with this printer is the price of ink. My printer uses 5 ink toner cartridges,blue magenta,yellow,cyan and black but the cost of replacing these inks is approx £50 which is the same price of the printer.

I always buy the original Canon ink cartridges as the colours that these inks cartridges reproduce are excactly the same as what I see on screen. I have used cheaper none Canon brand ink cartridges but they produce less superior results,with wishy washy colours and colour casts.

I can normally produce  about 20 A4 prints from a full set of Canon inks and dependent on what paper I use to print on this works out at about £3 per print.

This does seem a little expensive compared to the prices of the online printers which can produce the same image at a fraction of the price.

However you can not always guarantee the quality and exact colours of online of printing and the end result will always be printed as a jpg image. I did consider using my home printer to produce my images for my coursework but it only prints at a maximum size of A4. After a discussion with my tutor Steve we agreed that a size of A3 was more desirable size for presentation and to meet the course criteria

For the reason above I have produced my two sets of final images for this course using the two different print processes as outlined below

Printing Process N0 1..........Online printing.


I have produced a set of on-line printed images that were printed in the Jpg file format. Unfortunately I would have preferred to print in the raw/psd format which produces a lot finer,clearer image than a JPG. Unfortunately not many on-line printers support this type of format


DC Colour labs of manchester


This is the company that I used to print the majority of my photographs for this course. An online print company that have a very good reputation for speed,quality and reliability.They produce a vast array of different printed products that are very reasonably priced. These are a few of my screen grabs from the company


This is the companies's web page


Shown here are the 3 different printing interfaces that can be used to produce your images.Dependant on which interface you use your prints can be easily customised to suit individual requirements


Shown above are the various print sizes and costs from this online company


Show below are some of the different papers that DC offer customers for their printing. I always use the second paper down Fuji 570 which is a Lustre paper and always produces very good outstanding results

Shown here are the different print sizes that the company uses and their recommended pixel sizes


Printing Process N0 2        College inkjet printing


This is our college Hp Photosmart A3+ printer

This is the second  printing procces I have used to print my images for this course. This method of printing allows me to have full control and management over the whole print process of my images

I can select any grade and type of print paper of my choice to suit different types of images as opposed the the online printing companies which only gives a choice of 3 papers

Printing my own images also gave me a choice of what file format I choose to have my images printed in. I prefer my images printed from the raw format which gives better clarity, colour and full control over the parameters that can be applied to my images

I loaded all my images straight into Photoshop in the Raw format which I then transformed and converted into the PSD format. After manipulation in Photoshop I saved my images in the PSD file format which keeps all of my adjustments,layers and sizes which can be worked on again at a later date


I have covered all of the above topics in another one of my blog's entitled "Print Workflow"


Sunday 16 January 2011

Learning and research


(Photography Outings) Bristol day out with class mates

During the duration of my course my class mates and I have arranged numerous photography days out to various places and locations in and around the country. I find this to be an essential part of learning about the art of photography as we all need hands on experience of using equipment and learning new techniques. It doesn't matter if it's not your kind of subject to photograph on the day,it all adds to your experience and helps to improve techniques in your photography

We organised a trip to Bristol over the Christmas period just the 5 of us pictured above.As ventured around the city and it's docks in pursuit of photographs,we were constantly learning,sharing tips and techniques which all add to becoming a more experienced photographer

I think that learning in a group helps your photography immensely because you are always sharing views and maybe trying new directions in photography that perhaps you wouldn't have even thought about trying on your own

I had planned to capture some sea and  Landscape material to supplement my course work but this never really materialised as the light on the day was so flat, grey,and lifeless. However we stayed in Bristol until after night fall and produced some half decent night photography


One of my night shots of the docks


Shown below are some images from a  website called past and present which shows some lovely old photographs of Bristol during various times over the last two century's. I find that actually visiting a place and researching it's history and characteristics makes the photography more interesting and appealing

Click on the link below to view the website


http://www.pastandpresentpublications.com/bristol_imges.htm


Friday 14 January 2011

Print disadvantages

Print Disadvantages

As any photographer knows there is nothing like seeing a really nice well printed photograph that can be displayed,mounted,handled,inserted into books and albums etc. This is a lovely way to show off your finished prints. I find this method also a great way to present and show of your images and is definitely one of my favourites. However there are a lot of disadvantages associated with this method of presentation compared to other methods of presentation

There are numerous print sizes available shown below are just a few of the popular sizes

Different print sizes example
Shown below are a selection of print sizes that I sometimes use. I photographed my model Hannah in the college studio in a variety of different poses. I printed these images at a rate of 300 DPI which enabled me to blow up my photographs to really large sizes without pix-elation


A4


A3


A2

Disadvantages of print
There are a vast amount of disadvantages associated with this method of display, I have outlined a number of them below:

Costs:
I did consider this method of image presentation but the cost was far to high compared to presenting images on CD and Dvd or other mediums. Print  prices can vary. For example an A3 print can range from £2 to £10 per image from a good printer on quality paper.
This method can be very expensive but the costs at commercial printers have come down a lot over the past couple of years. The costs can come down if you have your images printed in a large batch instead of one and two's

Damage:
Prints can be damaged easily. Just touching the surface with any object or your fingers will scratch the surface layer which can ruin the photograph forever. Any type of moisture coming into contact with your photo will damage it making the colours run causing inks to bleed into each other. Corners are easily bent over and cheap papers tend to roll up and produce creases on the surface

Fading and degradation
Most prints will fade and degrade in time due to exposure to daylight and the elements surrounding it. It is essential to print images on high quality printing paper to reduce the threat of fading and degradation. It is essential to protect images by mounting them in frames that are covered at the front with glass or perspex. It is essential not to hang or mount photographs near windows where they will come into contact with sunlight or direct light which will in time degrade them due to fading

I always use high quality papers for my printing and also the mounts that I use to mount them on.
I make sure these are acid free products and make sure that they have guarantees that they will not fade or deteriorate with age

Profiles and reproduction printing:
Print colours are not always true and do not always print out the same as seen on a monitor or camera.Colour casts are sometimes evident so printing would have to be set up by the use of a profile. Sometimes there are colour casts in the printing with different hues and tones ,shades and casts are sometimes evident. This can all vary by the type of profile setup and type of printing paper used. There are so many different types of printing paper available nowadays which does have a great impact on the finished print. Setting up a print profile to replicate a perfect print seen on screen can be a tedius affair because calibration of a PC,monitor and printer all have to link together with the correct profile and calibration


I use DC Colour labs an online printing lab for my printing which supply their own print profiles for you to download. Once downloaded I load these into my profile list in my printer software drivers which will list the new profile, enabling me to list the new profile ready for print

Print Workflow

 Print Workflow 


I have produced two final sets of 10 thematic printed images for the modules of this course. 
This is an outline of the print workflow that I have used to produce my images


Creation of my images:
I have produced  two sets of thematic photographs as requested in our module briefs. These are as follows:


Set 1 (Landscapes) The Lake district in Autumn
Set 2 (Portraits) Street Performers


The photographs were all taken by myself with my Canon 7D camera with various lenses and were all taken in the raw format.


I choose this type of format for my images because it gave me the best possible scope to manipulate my images. This format provided me with the best possible quality,tones,colours and clarity and in my opinion is 2nd to none. Using this format allowed me to completely transform, sometimes, completely lifeless dull images, into very acceptable photographs which would not be at all possible using other file types such as jpg


Using the raw format enabled me to use very large image files at roughly 20 MB per photograph which retains all details as when the photograph was captured. This is not a compressed format,so maximum definition and clarity was kept in my images. I then make 3 copies of my images. Copy one on my storage media hard drive. Copies 2 an 3 are copied to DVD discs as a back up solution for archiving


Catalogue my images:
After image capture I used the Adobe software "Bridge" to organize and catalogue my images
I used the software Adobe Bridge to catalogue my photographs after they have been taken. I  first loaded all of my raw files into this software(approx 500 images)where I viewed,graded and remove unwanted undesirable or out of focus images.

I then rated my images using a star rating system which is built into the software which enabled me to easily group and rate my photographs for final selection by labeling each image with a 1-5  
star rating


Shown below is a screen grab from my Bridge software which shows the star ratings given to my photographs which makes life far easier when I want to select a group of images all with the same ratings


Once graded with a star rating It is then very easy to display just 4 or 5 star images instead of trawling through all of your images to find your best shots


Selection of images:
Over the duration of this course I have taken approximately 500 images for my course work. I have submitted  2 groups of approx 20 images for final approval that my tutor and I have agreed on for the final selection of images to be printed.

I then then narrowed down  my final 10 images which will be going to print later in the course. My tutor and I have critiqued my final selection of images and replaced less desirable images with more suitable images that fit the criteria of the brief of the course


Post Process Images:
Next I loaded all of my final 20  images into Photoshop where I worked on them to embellish and enhance their appearance. I used Photoshop CS3 at home and CS5 in college to post process my images before going to print


This is the stage of the workflow where I manipulated all of my images before going to print. Some of my images needed certain processing to make them look their best. I changed lighting,tones,white balance,colour and sharpening. I set up"Batch processing" a technique in Photooshop or Bridge where  a group of images are selected and then worked on as a "batch" instead of working on them individually which would take hours to complete. This allowed me to process a large group of photographs which all have the same characteristics as one another. In this way  they all  had the same process applied to them for eg, image size and cropping


This grab shows how I set up an action in Photoshop to manipulate a whole batch of images before they were batch processed 


I set up an "action" within Photoshop which enabled me to "Batch Process" most of my images. I applied this process to all my images to change image size and cropping which saved altering every single image one by one which would have taken hours instead of minutes


Image sharpening and final checks:
I set up another "Action" within Photoshop that  applied a final sharpening of 15% to all of my images after post processing them.This, I find gave my images a final burst of sharpness and clarity. I find giving over 15-20 % sharpening to my images starts to degrade the images and adds  a more grainy effdect which is not pleasing to the eye. I used the unsharp mask filter within Photoshop for this process. I gave a last visual check to my images then gave a final check to remove any unwanted or obtrusive objects that would be shown in the final print


Paper Selection:
There are a large variety of various printing papers out there on the market for photographs
The major ones being Gloss,Satin and Matt. Different papers suit different photographs


I have used two different print sources to print my images for this course

One source is from an online printing company(DC Colour labs) that specialises in photogrphic printing,the other is from our college where I am studying this course. They both used inkjet printers for printing my images and I would say that the college printing is slightly better than the on-line printing.


The main reason for this, is printing from college allowed me to print using PSD files straight from Photoshop which is basically my raw file with which is a much more refined file format that a jpg.The online printing was good but they only print images from Jpg's which loose quality and clarity due to its compressed file format

I have used two different types of paper to print off my images. . 


Paper N0 1- (College Printing)  A3+ HP Satin/Gloss 250 g for college printing. I have used this paper and printing method to produce my test prints but the costs build up easily at £3.50 for an A3+ image


A3+ paper is the only size available to students.This paper produces very fine crisp clear results
with very good tonal and colour renditions. However, small banding lines are  produced by the printer on close-up examination are evident but the banding is not noticeable when the paper is viewed from over 1 foot or more away from the paper


Most of my images will be viewed at greater distances so the tiny banding marks will not be at all evident


Advantages of this printing process and it's paper


Clarity: Finer image detail
Print from Raw: Files printed straight from photoshop
Control: Having full control of how the print is managed and printed


Disadvantages: Slight banding at closer inspection. Costly at £3.50 per print


Paper N0 2 - (On-line printing, DC colour labs) A3 Fuji dp11 pro Lustre paper
This is a very nice paper giving a very smooth texture with good clarity with rich colours. However these prints always tend to be printed a little more on the dark side than what is actually viewed on a computer screen


Advantages of this printing process and it's paper


Cost: Only £1.05 for a A3 print
Speed: Order one day and deliver the next
Reliability: Great reliable service with consistent results
Copyright: Title and date printed on the reverse of the image 


Disadvantages: Only able to print from JPG's


I have used both of these papers before and both give pretty pleasing results but overall the college printing and paper have the edge over the online printing. This is mainly due to richer more vibrant colours, better clarity and a smoother texture on a thicker quality paper


Printer Setup and calibration and test prints:


This is the college A3 HP Photosmart Pro B9100 printer that I used to print some of my images for my course work


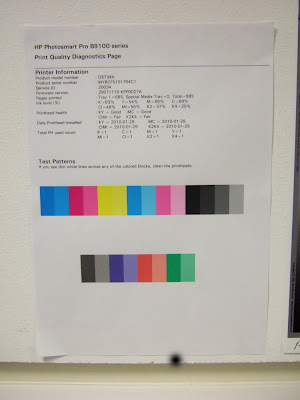
Before I begun to produce my test prints, I tested the calibration and set-up of the college Printer an HP Photosmart Pro B9100 series to make sure the printer was working fine. This involved making sure that ink supplies were sufficient and ink was flowing correctly through the print nozels. I carried out this process to check there was no fading,streaking or banding evident before I produced my final prints.


Shown above is a screen grab from our college printer and the utility that shows the actual remaining ink levels of the ink cartridges


To carry out the above checks I  produced a print calibration test page which automatically cleaned my print head nozels for me. This calibration  process also aligned and adjusted my print head nozels automatically. This procedure reduces banding and streaking marks that can be seen on prints that have not been calibrated


Shown above are all the processes that I performed before I printed my final images. Performing these routines assures printing will be at it's optimal best that the printer can perform


Printing a test pages shown above is essential, it will show streaking,banding and white lines if the printer is not set up correctly. The test page also allows me to check colours,clarity and sharpness which helps to confirm that the test print is pretty much what you see on the computer monitor.A very useful tool

I always carry out the above procedure before I complete any kind of printing in college which is an essential step in my print work flow


This is the stage of the work flow where I carry out all of my checks for potential printer problems. 
Some of the problems have been banding,streaking and fading in my images and blocked printer heads. These are all common printer problems which occur regularly and can usually be remedy'd by simple regular maintenance routines


I carried out all of the print problem repair routines listed above before I printed my final images.
This assured me I would have a problem free print workflow of my final images


My Image test prints: 
I will normally make at least 2 test prints of my own images to make sure that my colours in my test prints match as near as possible the colours and tones that I see on my colour computer monitor.


Shown below is one of my test prints that I have produced before I printed my final images. It shows the printer interface settings. This is the part of the printing process which enables me to manage printer properties, such as changing colour,profile,size and print parameters


Shown above is a screen grab of one of my test prints that I performed before I printed my final images


Print Images:  

The first step in preparation of getting my photographs ready for print, is to complete final checks such as removing unwanted or obtrusive objects and foreign bodies that would cause distractions in the the photograph.Complete sharpening and finally resize my images for the correct size to print.


My images are for presentation and course work so the standard of print needs to be very high. For this reason I have chosen 300 DPI (Dots per inch) to print my images which will give me a very high quality print for presentation. Choosing this ammount of pixels per inch will add a lot more pixels into the image which will increase,colour,tones,definition and clarity.


I know that using the higher DPI will allow me to blow up or enlarge my images to really high poster sizes etc without the fear of knowing my images will become pix-elated  and out of focus.
300 Dpi is the standard that most printers require nowadays to print large images at a high standard


Using 72 dots per inch is another standard that is used all over the world. This is used to display images and graphics on computer monitor screens and web pages which do not need high DPI's. Using 72 DPI will display an image adequately on any screen or website without pix-elation

After I am satisfied that the colour,tones and sharpness are as equal to what I have seen on my clour monitor,I will then proceed to produce my images


Shown above are some of my screen grabs which show my final printer adjustments before I printed my final images. I configured my images on a blank document in photoshop then aligned them together using the grid tool.

On this occasion I printed 4 images on 1 A3+ print to demonstrate printing and test printing using the college printers

Present Final images:
Theses are my two sets of Final printed images which I am quite pleased about. All printed from the on-line printing company DC Colour labs from Manchester and Burton College A3 printer


At a price of £1.05 for the an A3 print of this quality I find this excellent value for money. I would have preferred to print all of my images on our college printer which does create a little bit finer print than the online option but at the price of £3.50 for an A3 print I had to bare costs in mind and had to settle for the former


The college printing is good and well set up with good equipment but as a student I had to settle for £21.00 for 20 prints as opposed to the college's £70.00


Final10 Street Performers (Portraits)


Final 10 Lake District  Autumn Landscapes (Landscapes)